
Engine Fluids, Gear Oil & Filter Specifications
| Engine Oil Viscosity & Standard | SAE 15W-40 / 10W-40 API SL/SJ JASO MB |
|---|---|
| Engine Oil Capacity | 0.8 L (drain) / 0.9 L (total) |
| Final Drive / Gearbox Oil | SAE 80W-90 GL-5 — 90 ml (refill) / 100 ml (total) |
| OEM Oil Strainer Part Number | 15421-GY6-000 (Cleanable wire mesh strainer screen) |
| OEM Air Filter Element Part Number | C1243000000 |
| Spark Plug Model & Electrode Gap | NGK C7HSA (0.6 – 0.7 mm) |
Field note: The Genuine Buddy 125 engine holds 0.8L during oil drains. Clean the 15421-GY6-000 mesh strainer screen with solvent during every service interval. Gearbox takes 90ml of SAE 80W-90 GL-5 gear oil.
Fuel & Ignition Systems
| Component / Spec | Detail |
|---|---|
| CVK Carburetor | OEM: 16100-PNA-000 | 24mm venturi |
| Intake Manifold Torque | 10 Nm |
| Ignition Coil | OEM: 13000-PNA-000 | Primary: 0.2-1.2Ω |
| Coil Mounting Torque | 9 Nm |
Field note: Over-tightening the carburetor intake manifold beyond the 10 Nm spec is one of the most common
mistakes seen in the field. Excess clamping force warps the rubber intake flange, which creates a hard-to-diagnose
vacuum leak that only manifests as erratic idling, hesitation on throttle, or intermittent stalling. Always
torque to spec with a calibrated wrench rather than tightening "by feel."
CVT Transmission System
| Component / Spec | Detail |
|---|---|
| CVT Drive Belt | OEM: 1B01B-A00 | 743 x 20 x 30 mm |
| Drive Face Nut Torque | 55 Nm |
Field note: Failing to torque the variator drive face nut to exactly 55 Nm during a belt change can allow the
nut to back off under sustained high-RPM operation. This is not a minor issue: it will destroy the crankshaft
splines and can necessitate a full crankshaft replacement. Always clean and inspect the splines for corrosion
or debris before reinstallation, and verify final torque with a calibrated wrench rather than an impact driver.
Engine Internals: Cylinder Head & Crankshaft
| Part No. | Qty | Part Name | Notes |
|---|---|---|---|
| P66500002T00 | 1 | Head Comp, Cylinder | Includes valve seats pre-installed; resurface flatness tolerance 0.05mm max |
| P66500202T00 | 2 | Valve, Exhaust | Sodium-filled stem on later revisions; check margin thickness > 0.5mm |
| P66500152T00 | 2 | Valve, Inlet | Larger head diameter than exhaust valve — do not swap positions |
| P66500352T00 | 1 | Gasket, Head Cyl. | Metal composite, single-use only — never reuse after removal |
| P66500402T01 | 4 | Exhaust Stud Bolts | M6 x 1.0, torque to 12 Nm in criss-cross sequence |
| P66500552T00 | 1 | Camshaft Comp. | Inspect lobe wear — min lift spec 5.8mm before replacement |
| Part No. | Qty | Part Name | Notes |
|---|---|---|---|
| P66600012T00 | 1 | Crankshaft Comp. | Check runout < 0.03mm on V-blocks before reuse |
| P66600052T00 | 1 | Crank Pin | Press-fit only; do not hammer — use hydraulic press with alignment jig |
| P66600102T00 | 1 | Connecting Rod | Big-end side clearance spec: 0.1-0.4mm; replace if scored |
| P66600152T01 | 1 | Piston (Std. 52.4mm) | +0.25mm / +0.50mm oversize also available for rebored cylinders |
| P66600202T00 | 1 | Piston Pin | 14mm dia. — lightly oil before install, must slide by hand pressure only |
| P66600252T00 | 2 | Piston Pin Clip (Circlip) | Directional installation — see expert note below before fitting |
Field note — read before touching the piston pin clips: on the GY6 125 short block, the piston pin
circlips are NOT symmetrical in how they seat, and installing either clip with its opening gap facing the
direction of piston travel is a guaranteed failure. Under load, the clip flexes on every stroke; if the gap is
oriented in the travel direction, centrifugal and inertial forces compress the clip until it walks out of its
groove and ejects into the crankcase. Once that happens, the now-unretained piston pin migrates sideways and
gouges the cylinder wall on the next stroke, destroying the bore, the piston, and frequently the head in one
catastrophic event. Always orient the clip gap at 90° to the direction of travel (toward the top or bottom
of the bore, never toward the front or back), use new clips every time — never reinstall a used one —
and confirm with a fingernail that the clip is fully seated in its groove before closing the case halves.
OEM Body Panels & Color Matching
| Part Name | >2008 Tangerine | >2008 Seafoam | 2009 Blackjack | >2014 Matte Titanium |
|---|---|---|---|---|
| Handle Upper Cover | P66130012T02 | P66130012S04 | P66130012B09 | P66130012M17 |
| Front Lower Cover | P56260132C00 | P56260132S04 | P56260132B09 | P56260132M17 |
| LH Side Cover | P66230212T02 | P66230212S04 | N/A | P66230212M17 |
| RH Side Cover | P66230222T02 | P66230222S04 | N/A | P66230222M17 |
| Rear Luggage Bracket | N/A | N/A | N/A | N/A |
| Front Fender | P56220012T02 | P56220012S04 | P56220012B09 | N/A |
| Rear Fender / Tail Cover | P66240452T02 | P66240452S04 | P66240452B09 | P66240452M17 |
| Floor Board Panel | P56270082C00 | N/A | P56270082B09 | P56270082M17 |
| Leg Shield, Inner | P56280012C00 | P56280012S04 | P56280012B09 | N/A |
| Windshield Cowl | N/A | N/A | N/A | P66290012M17 |
Field note: These are OEM painted plastic panels, not raw ABS — after roughly three years of continuous
UV exposure, the plastic mounting tabs behind the painted surface become progressively brittle, even though
the visible paint may still look presentable. Never use an impact driver or power tool on the body screws
holding these panels; the sudden torque spike that a power tool delivers on a brittle tab snaps it instantly,
and replacement panels of this age are frequently discontinued or color-matched at a premium. Always remove
body screws by hand with a hand screwdriver, working slowly, and apply a small amount of silicone grease
(never petroleum-based grease, which degrades rubber) to the rubber grommets before removal so the panel can
flex free of the tab without cracking it. If a tab is already cracked, repair it with plastic weld before
reinstalling rather than forcing a screw into a broken mount.
OEM Technical Schematics & Assembly Diagrams
Exploded factory assembly diagrams for Genuine Buddy engine, transmission, fuel, and chassis sub-systems. Click any schematic to view high-resolution component breakdown.
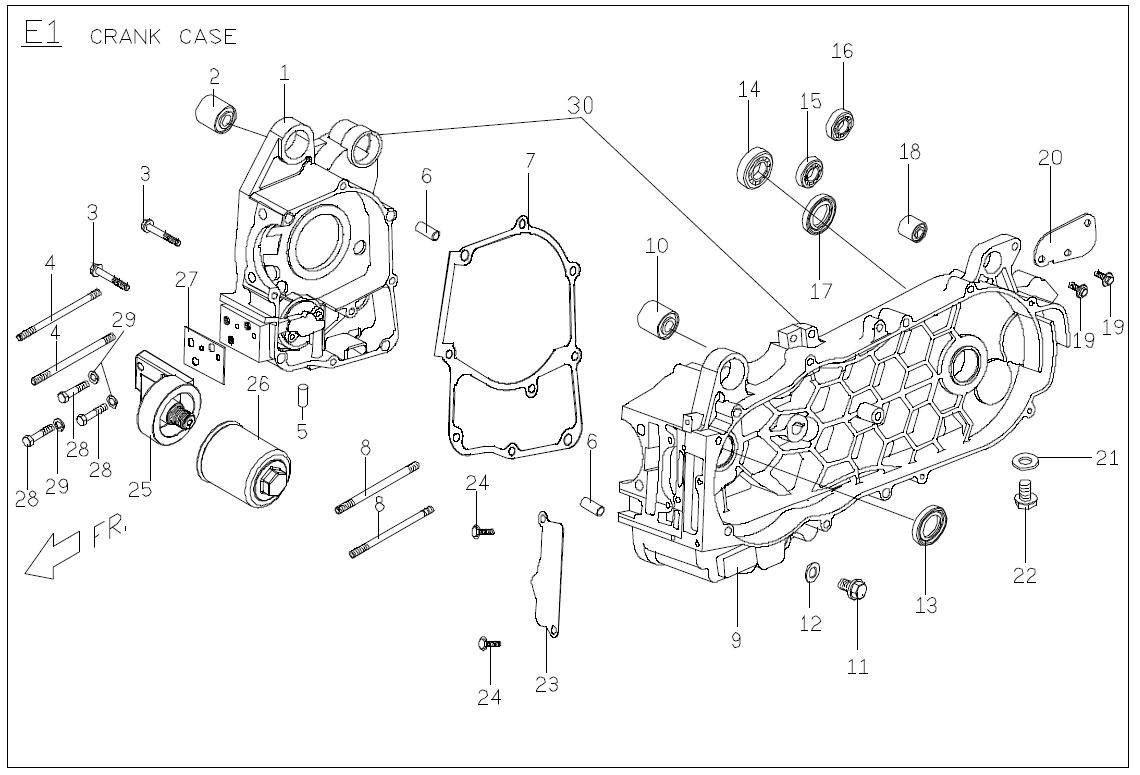
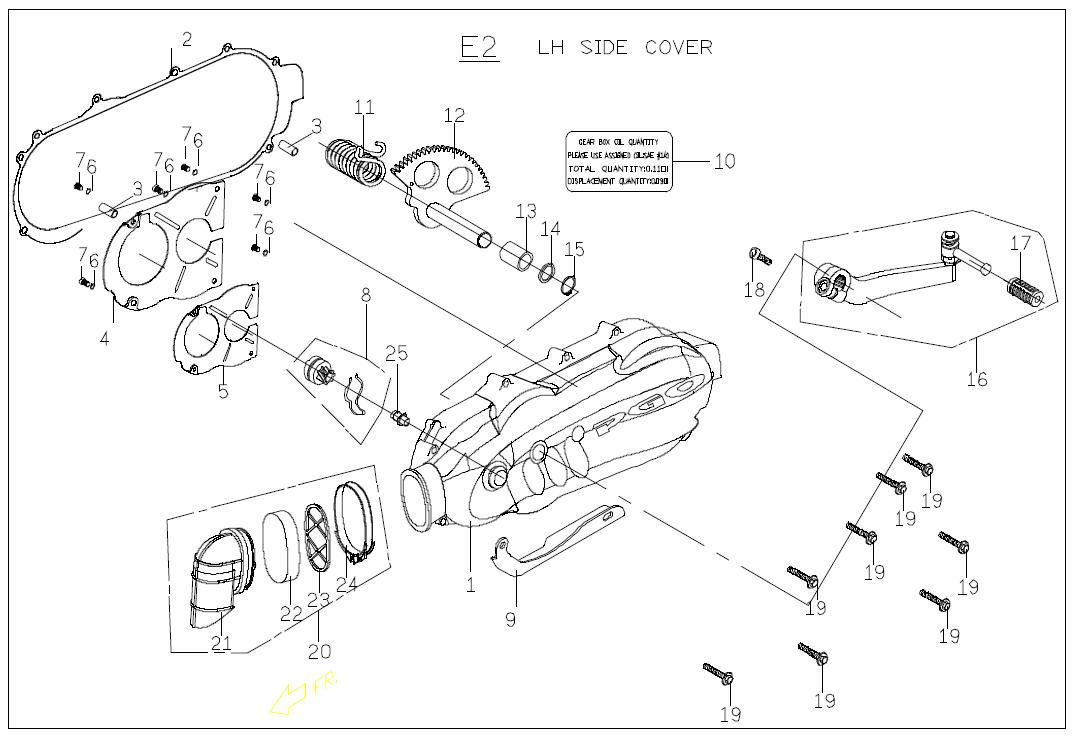
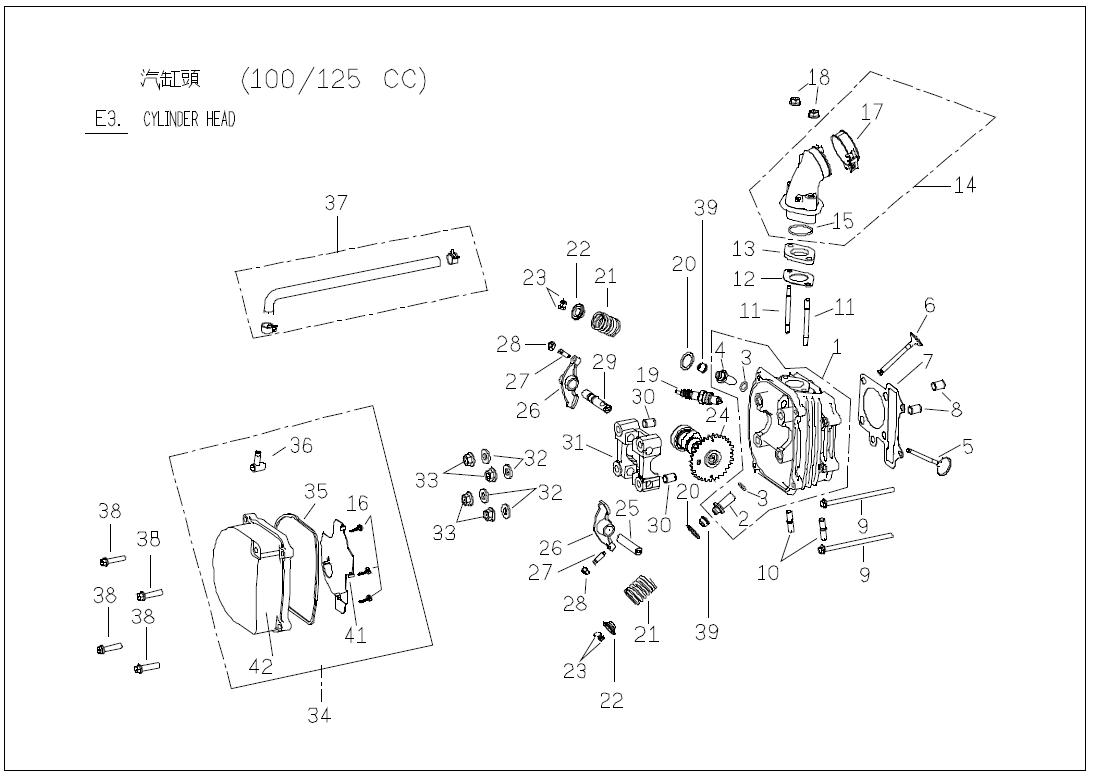
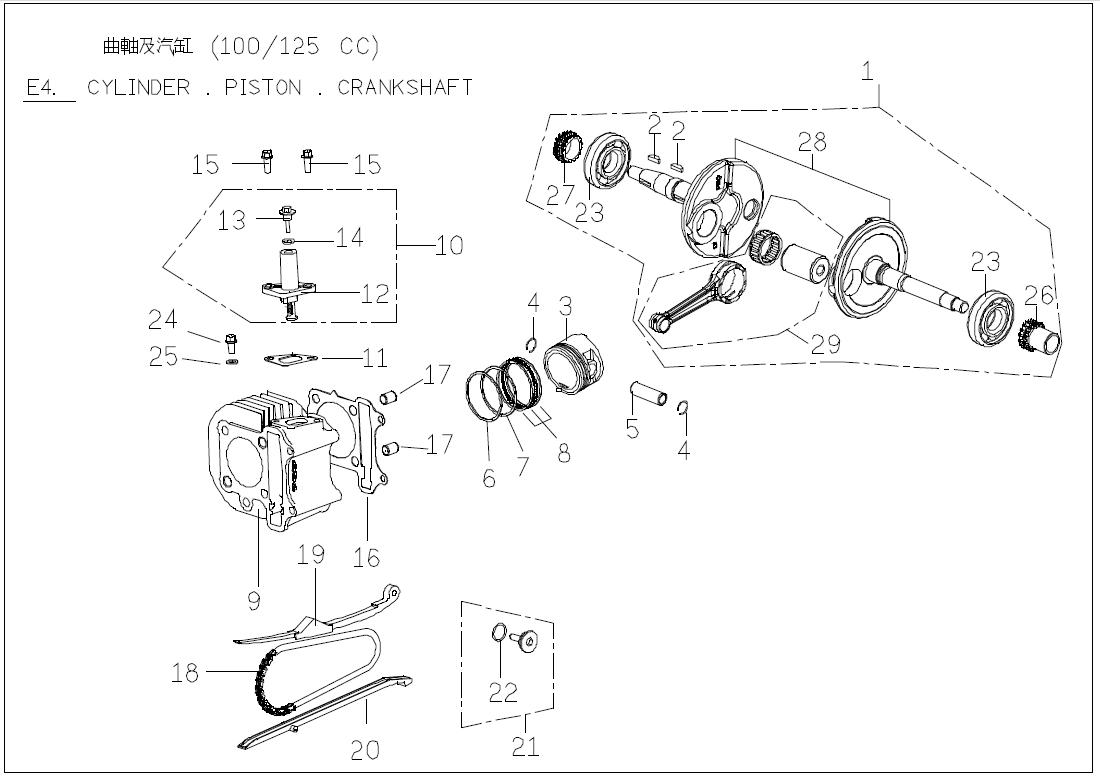

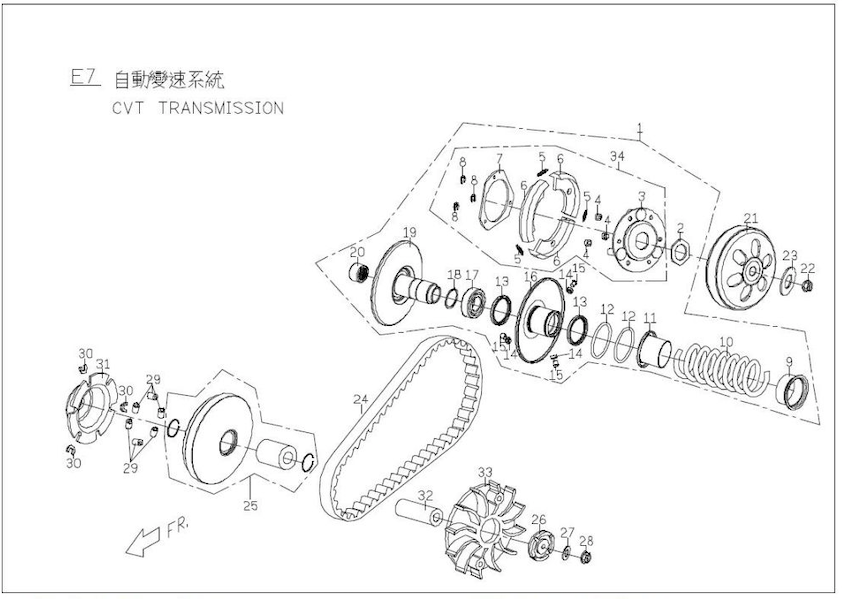
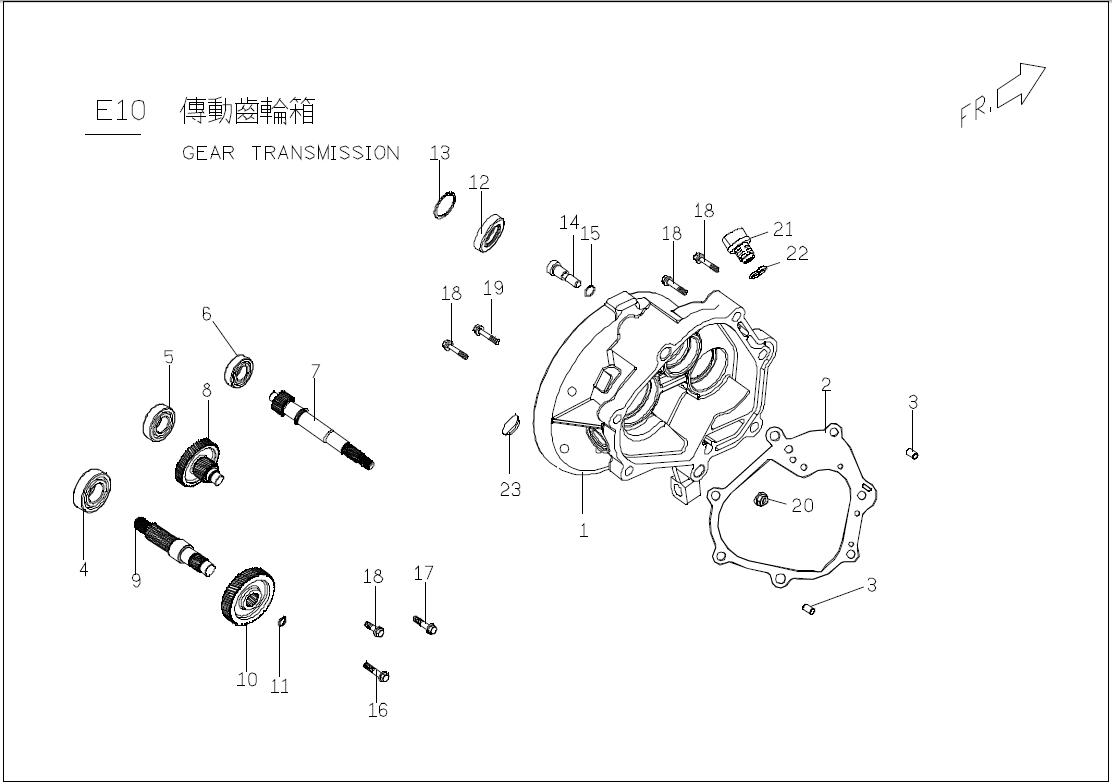
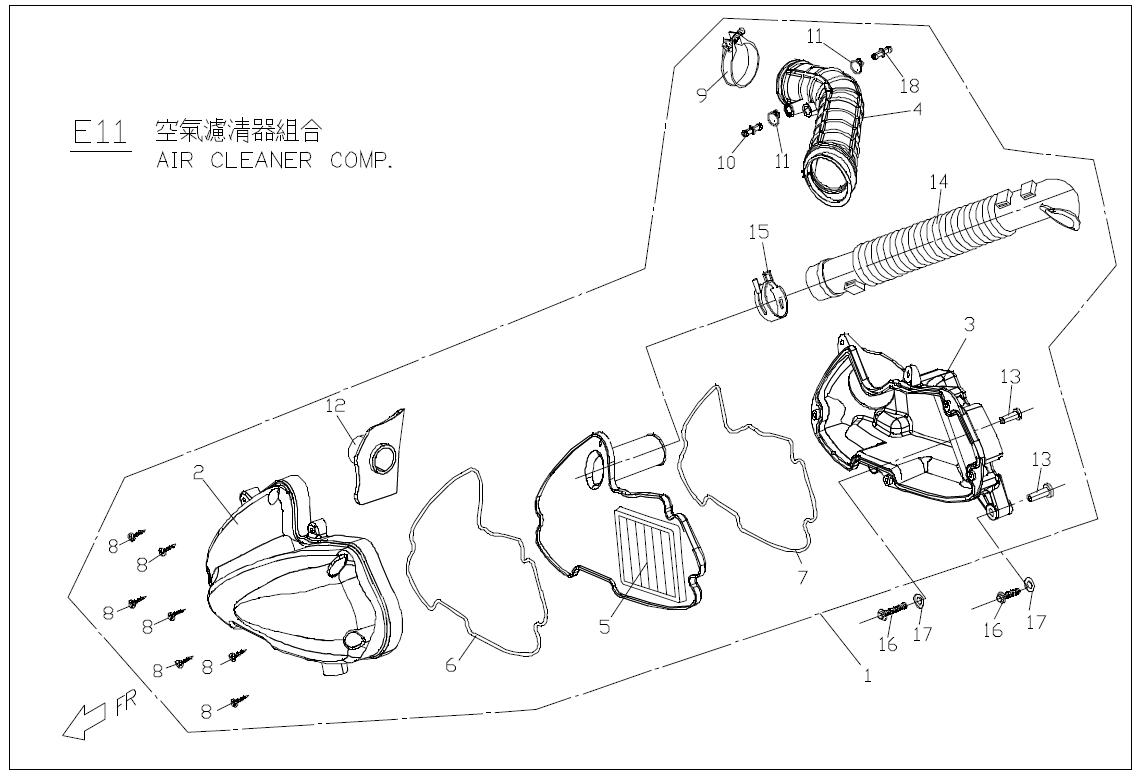
Official Factory Resource: Download the complete Genuine Buddy 50/125 Complete OEM Parts Manual (PDF) for official factory part numbers, exploded sub-assembly views, and fast-moving replacement references.
Official Technical Reference
The specifications above are cross-checked wherever possible, but this guide does not replace the factory service manual. Before ordering parts or performing a repair, confirm current fitment and revision bulletins directly with Genuine Scooter Co.
Visit Genuine Scooter Co. Official Site & Parts Resources